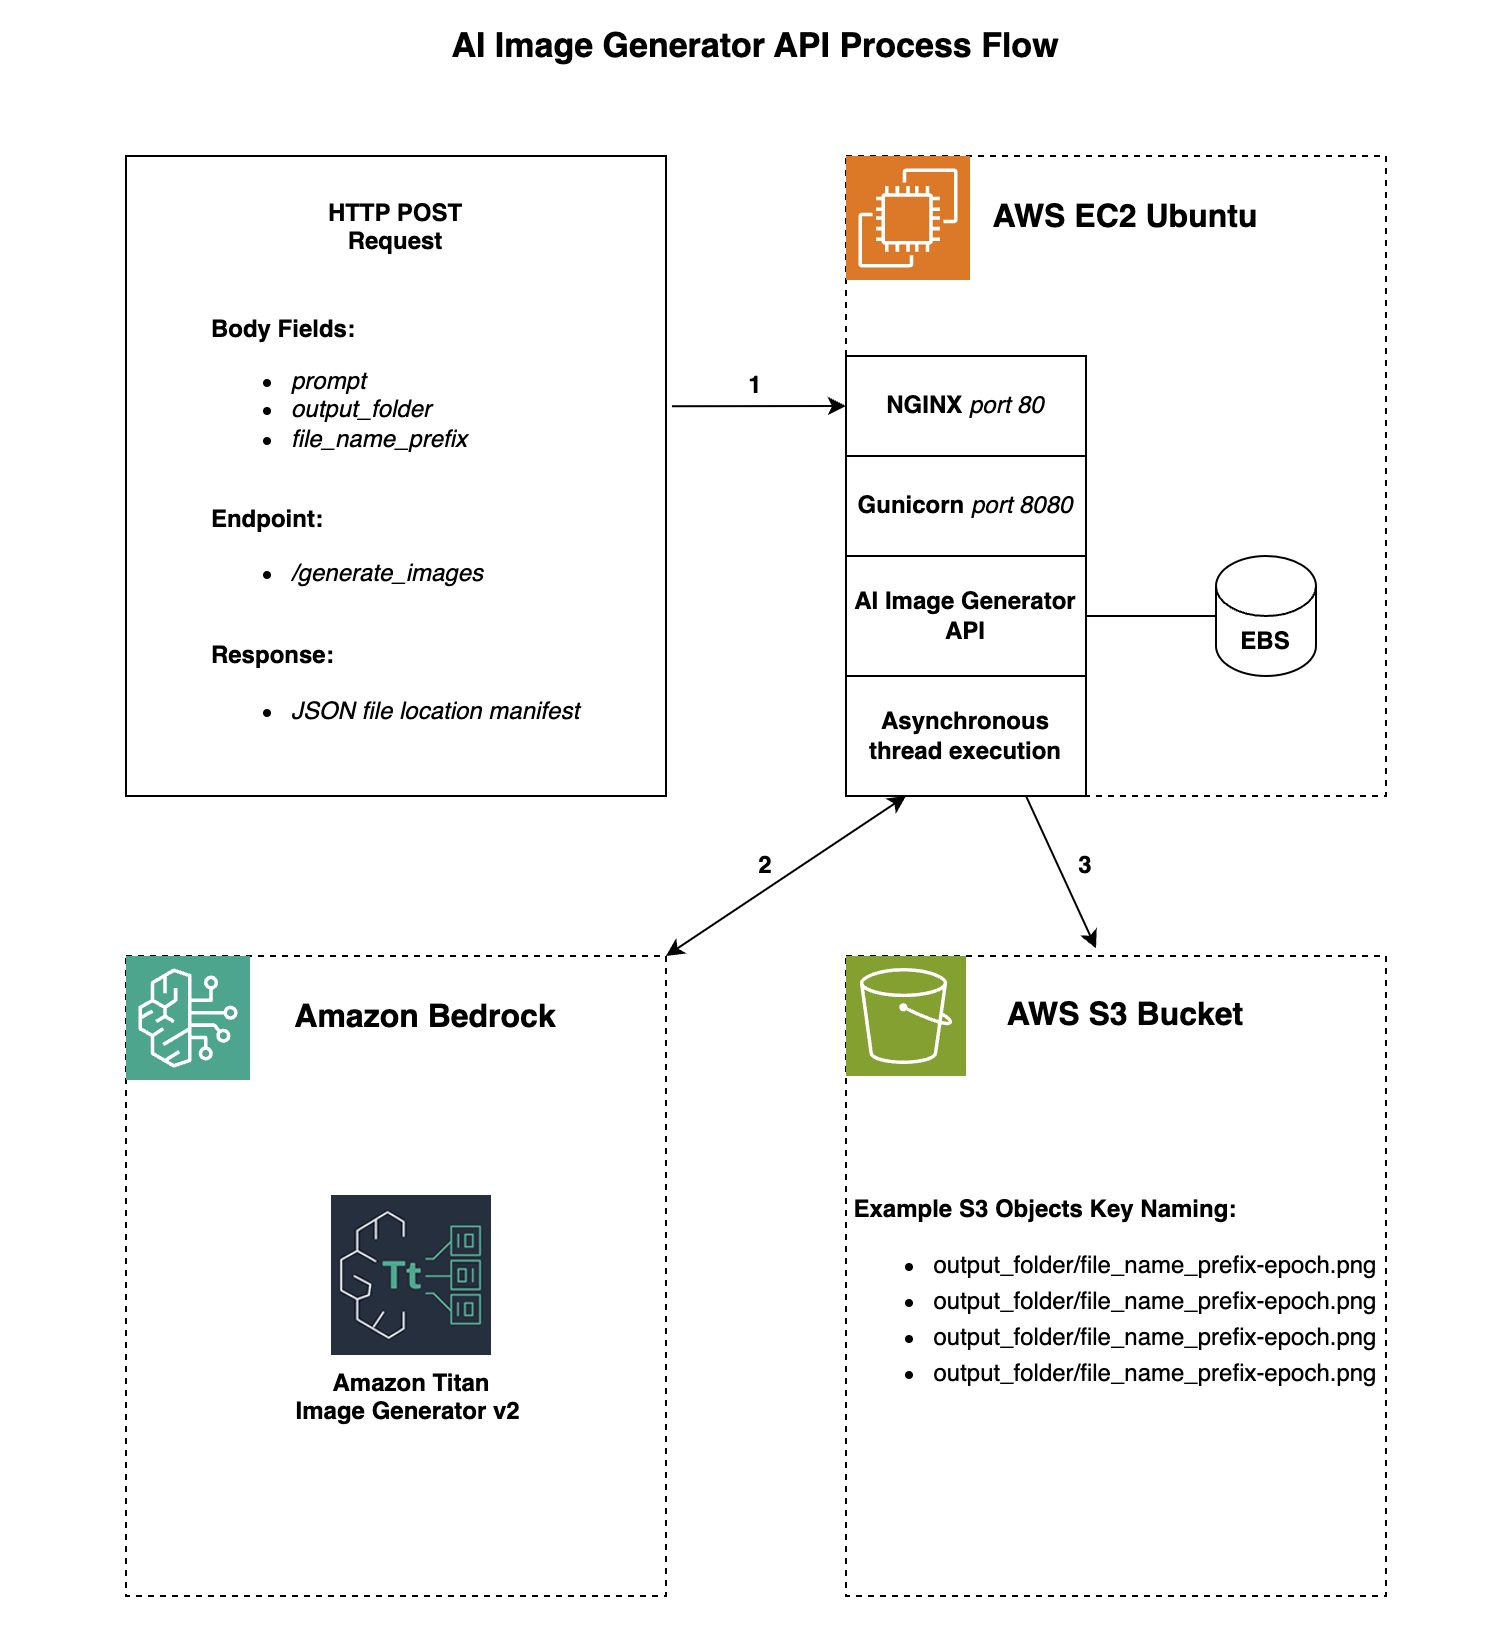
This article will cover building an asynchronous GenAI image generator API, leveraging Amazon Bedrock Titan Image Generator v2. The API creates asynchronously four unique images based on your prompt and stores them in S3. Generating the images asynchronously allows for a faster processing of multiple images. The API will accept an HTTP POST request with the requested images and file name and folder location.
API Overview:
promptis the description of the image you want generated.output_folderis the folder path to the image files, part of the S3 key.file_name_prefixis the name of the image file which will end up with a Unix epoch timestamp appended to it, part of the S3 key.- Amazon Web Services Account
- Enable Amazon Bedrock Access (Specifically Amazon Titan Image Generator v2) see: Manage access to Amazon Bedrock foundation models.
- EC2 Instance Role with AmazonBedrockFullAccess and AmazonS3FullAccess applied to your EC2 instance (note you can make this more secure by making a custom policy).
- Verified on EC2 Instance Ubuntu 22.04 and Ubuntu 24.04
- Verified on Python 3.10, 3.11, 3.12
- Virtualenv
- AWS Default Region is set to us-east-1 you can change the region in the
image_generation.pyfile underregion_name='us-east-1' - AWS S3 bucket
- https://aws.amazon.com/bedrock/pricing/
- https://aws.amazon.com/ec2/pricing/on-demand/
-
Create a POST request to the /generate_images endpoint, that has
prompt, output_folder and file_name_prefix.
-
Example POST request BODY:
{"prompt": "red porsche", "output_folder": "000/111", "file_name_prefix": "porsche_image"}
Four unique images will be generated based on your prompt and uploaded to the S3 bucket you specify in image_generation.py under AI_S3_BUCKET_NAME
You will get a JSON manifest of file names after the images are generated.
-
Example POST request Response:
{"images": ["000/111/porsche_image-1728409676.376359.png", "000/111/porsche_image-1728409676.376369.png", "000/111/porsche_image-1728409676.376371.png", "000/111/porsche_image-1728409676.3763719.png"]}
Code:
-
GitHub repo with files referenced in this blog ai-image-generator
Prerequisites:
AWS Resource Costs
As with most AWS services you will incur costs for usage.
Step 0
Install some dependencies
sudo apt -y update

sudo apt -y install build-essential openssl

sudo apt -y install libpq-dev libssl-dev libffi-dev zlib1g-dev

sudo apt -y install python3-pip python3-dev

sudo apt -y install nginx

sudo apt -y install virtualenvwrapper
Step 1
Setup the Python environment
cd /home/ubuntu

virtualenv ai-image-generator_env

source ai-image-generator_env/bin/activate
Step 2
Create a directory for your project.
mkdir /home/ubuntu/ai-image-generator

cd /home/ubuntu/ai-image-generator
Step 3
Create a file requirements.txt for your Python dependencies.
vim requirements.txt
boto3
botocore
Pillow
watchdog
requests
flask
flask-json
gunicorn
setproctitle
pip install -r requirements.txt
Step 4
Create a file image_generation.py which has image generation code.
cd /home/ubuntu/ai-image-generator

vim image_generation.py
Make sure you put the S3 bucket you want to use in the
AI_S3_BUCKET_NAME section.
import io
import os
import base64
import json
import random
import boto3
from PIL import Image

AI_S3_BUCKET_NAME = "YOUR_S3_BUCKET_NAME_HERE"
AI_IMAGE_GENERATOR_TMP_PATH = "/tmp/ai_image_generator/"
NEGATIVE_PROMPTS = "poorly rendered, poor background details"

# Set Titan generative AI image generation settings.
def ai_image_settings(prompt):

    # Unique AI image random seed generation.
    random_seed = random.randint(0,2147833647)

    body = {
                "taskType": "TEXT_IMAGE",
                "textToImageParams": {
                "text": prompt,                    # Required
                "negativeText": NEGATIVE_PROMPTS   # Optional
             },
            "imageGenerationConfig": {
            "seed": (random_seed), # Range: 0 to 214783647
            "numberOfImages": 1,   # Range: 1 to 5
            "quality": "premium",  # Options: standard or premium
            "height": 1024,        # Supported height list in the docs
            "width": 1024,         # Supported width list in the docs
            "cfgScale": 9          # Range: 1.0 to 10.0
            }
    }

    json_string = json.dumps(body, indent=4)
    return json_string

# AI Image generation and storage.
def ai_image_generation(prompt, local_file_name, output_folder):

    # Invoke Amazon Titan image generator v2.
    boto3_bedrock = boto3.client('bedrock-runtime', region_name='us-east-1')
    ai_model = boto3_bedrock.invoke_model(
        body=ai_image_settings(prompt),
        modelId="amazon.titan-image-generator-v2:0",
        accept="application/json",
        contentType="application/json"
    )

    # Process the AI image Base64.
    response_body = json.loads(ai_model.get("body").read())
    image_base64 = response_body["images"][0]

    # Decode Base64 bytes and save image.
    ai_image = Image.open(
        io.BytesIO(
            base64.decodebytes(
                bytes(image_base64, "utf-8")
            )
        )
    )

    ai_image.save(f"{AI_IMAGE_GENERATOR_TMP_PATH}/{output_folder}/{local_file_name}")

    # Store images in S3.
    s3 = boto3.client('s3')
    bucket = AI_S3_BUCKET_NAME
    file_name = (f"{AI_IMAGE_GENERATOR_TMP_PATH}/{output_folder}/{local_file_name}")
    key_name = os.path.join(output_folder, local_file_name)
    s3.upload_file(file_name, bucket, key_name, ExtraArgs={'ContentType': "image/png"})

    # Delete temporary local copy.
    os.remove(f"{AI_IMAGE_GENERATOR_TMP_PATH}/{output_folder}/{local_file_name}")

# Local cleanup function.
def delete_files_in_directory(directory_path, rm_dir=False):
    try:
        files = os.listdir(directory_path)
        for file in files:
            file_path = os.path.join(directory_path, file)
            if os.path.isfile(file_path):
                os.remove(file_path)

        if (rm_dir):
            os.rmdir(directory_path)

        print("All image files deleted successfully.")
    except OSError:
        print("Error occurred while deleting image files.")
Step 5
Create a file ai_image_generator.py which has the Flask routing code and logic.
cd /home/ubuntu/ai-image-generator

vim ai_image_generator.py
import os
import json
import time
import concurrent.futures
from flask import Flask, request
from flask_json import FlaskJSON, JsonError, json_response
from image_generation import ai_image_generation, delete_files_in_directory

AI_IMAGE_GENERATOR_TMP_PATH = "/tmp/ai_image_generator/"

ai_image_generator = Flask(__name__)
FlaskJSON(ai_image_generator)

# 500MB Upload File Size Limit
ai_image_generator.config['MAX_CONTENT_PATH'] = 500 * 1024 * 1024

# Data validations.
def ai_image_generator_data_validation(request_data):
    try:
        prompt = str(request_data['prompt'])
    except (KeyError, TypeError, ValueError) as e:
        raise JsonError(description='Invalid prompt.') from e
    try:
        output_folder = str(request_data['output_folder'])
    except (KeyError, TypeError, ValueError) as e:
        raise JsonError(description='Invalid output_folder.') from e

    try:
        file_name_prefix = str(request_data['file_name_prefix'])
    except (KeyError, TypeError, ValueError) as e:
        raise JsonError(description='Invalid file_name_prefix.') from e

    return prompt, output_folder, file_name_prefix

# Health check route.
@ai_image_generator.route("/")
def health():
    return json_response(health="true")

# Generate images route.
@ai_image_generator.route('/generate_images', methods=['POST'])
def generate_images():
    request_data = request.get_json(force=True)
    prompt, output_folder, file_name_prefix = ai_image_generator_data_validation(request_data)

    output_path = os.path.join(AI_IMAGE_GENERATOR_TMP_PATH, output_folder.strip())

    # Checks if output folder exists, makes one if not. Delete files in folder if it does exist.
    if not os.path.exists(output_path):
        os.makedirs(output_path)
    else:
        delete_files_in_directory(output_path)

    #  Use a pool of threads to execute generation of 4 images asynchronously.
    with concurrent.futures.ThreadPoolExecutor() as executor:
        futures = []

        file_name = [(f"{file_name_prefix}") + "-" + str(time.time()) + ".png", (f"{file_name_prefix}") + "-" + str(time.time()) + ".png", (f"{file_name_prefix}") + "-" + str(time.time()) + ".png", (f"{file_name_prefix}") + "-" + str(time.time()) + ".png"]
        for file in file_name:
            futures.append(executor.submit(ai_image_generation, prompt=prompt, local_file_name=file, output_folder=output_folder))
        for future in concurrent.futures.as_completed(futures):
            print(future.result())

    # Return JSON output of location/files generated.
    keys = []
    for file in file_name:
        keys.append((os.path.join(output_folder, file)))

    manifest = {"images": keys}

    return json.dumps(manifest)

if __name__ == "__main__":
    ai_image_generator.run(host='0.0.0.0')
Step 6
Create your wsgi.py webserver gateway interface for the Flask microframework
vim /home/ubuntu/ai-image-generator/wsgi.py
from ai_image_generator import ai_image_generator

if __name__ == "__main__":
    ai_image_generator.run()
Step 7
Create a file gunicorn_ai-image-generator.conf which will be the configurations Gunicorn will utilize. Gunicorn is a Python WSGI HTTP Server for UNIX. For more information about Gunicorn read here.
cd /home/ubuntu/ai-image-generator

mkdir gunicorn

cd gunicorn

vim gunicorn_ai-image-generator.conf
Add the following to gunicorn_ai-image-generator.conf
pidfile = 'ai_image_generator.pid'
worker_class = 'gthread'
workers = 5
worker_connections = 1000
timeout = 30
keepalive = 2
threads = 2
proc_name = 'ai_image_generator'
bind = '0.0.0.0:8080'
backlog = 2048
accesslog = 'access.log'
errorlog = 'error.log'
user = 'ubuntu'
group = 'ubuntu'
Step 8
Create a Systemd service file. Systemd is a service manager and in this use case it will manage Gunicorn.
sudo vim /etc/systemd/system/ai-image-generator.service
Add the following to ai-image-generator.service
[Unit]
Description=AI Image Generator API
After=network.target

[Service]
User=ubuntu
Group=ubuntu
WorkingDirectory=/home/ubuntu/ai-image-generator
Environment="PATH=/home/ubuntu/ai-image-generator_env/bin"
ExecStart=/home/ubuntu/ai-image-generator_env/bin/gunicorn --config=gunicorn/gunicorn_ai-image-generator.conf wsgi:ai_image_generator

[Install]
WantedBy=multi-user.target
Step 9
Start your application via Systemd and enable it to auto start after reboot
sudo systemctl start ai-image-generator

sudo systemctl enable ai-image-generator.service
Step 10
Create your applications NGINX config nginx_ai-image-generator.conf that makes NGINX listen on port 80 and proxies requests to Gunicorn on port 8080. NGINX will help with connection handling increasing performance.
sudo vim /etc/nginx/sites-available/nginx_ai-image-generator.conf
Add the following to nginx_ai-image-generator.conf
server {
    listen 80 default_server;

    location / {
        include proxy_params;
      	proxy_set_header X-Forwarded-For $proxy_add_x_forwarded_for;
        proxy_set_header X-Real-IP	$remote_addr;
      	proxy_set_header Host $http_host;
      	proxy_redirect off;
        proxy_buffers 8 24k;
        proxy_buffer_size 4k;
        proxy_pass http://127.0.0.1:8080;
    }
}
Step 11
Delete your default NGINX conf file, enable your new NGINX conf and restart NGINX
sudo rm /etc/nginx/sites-enabled/default

sudo ln -s /etc/nginx/sites-available/nginx_ai-image-generator.conf /etc/nginx/sites-enabled

sudo systemctl restart nginx
Step 12
Time to test your API! From a command line you can test the API out by running:
curl -X POST --data '{"prompt": "red porsche", "output_folder": "000/111", "file_name_prefix": "porsche_image"}' http://{yourhost}:80/generate_images
Notes:
Summary:
Hopefully this blog article helps you create a robust scalable AI driven image generation API. The idea is that a UI/UX of your design will leverage this API to display four images for the end user to choose from. Images will be generated at the same time so all four images will take the same amount of time as one image. The parameters allow for storage in some form of hierarchy with a folder path, and each image will have a unix epoch timestamp. An example structure could be account-number/project-number/file-name. The API will generated a JSON response with where the images are located in S3 for your UI/UX to handle.
If you like this blog article you may want to read my other article on Building a GenAI PDF Query App with a RAG Architecture.